

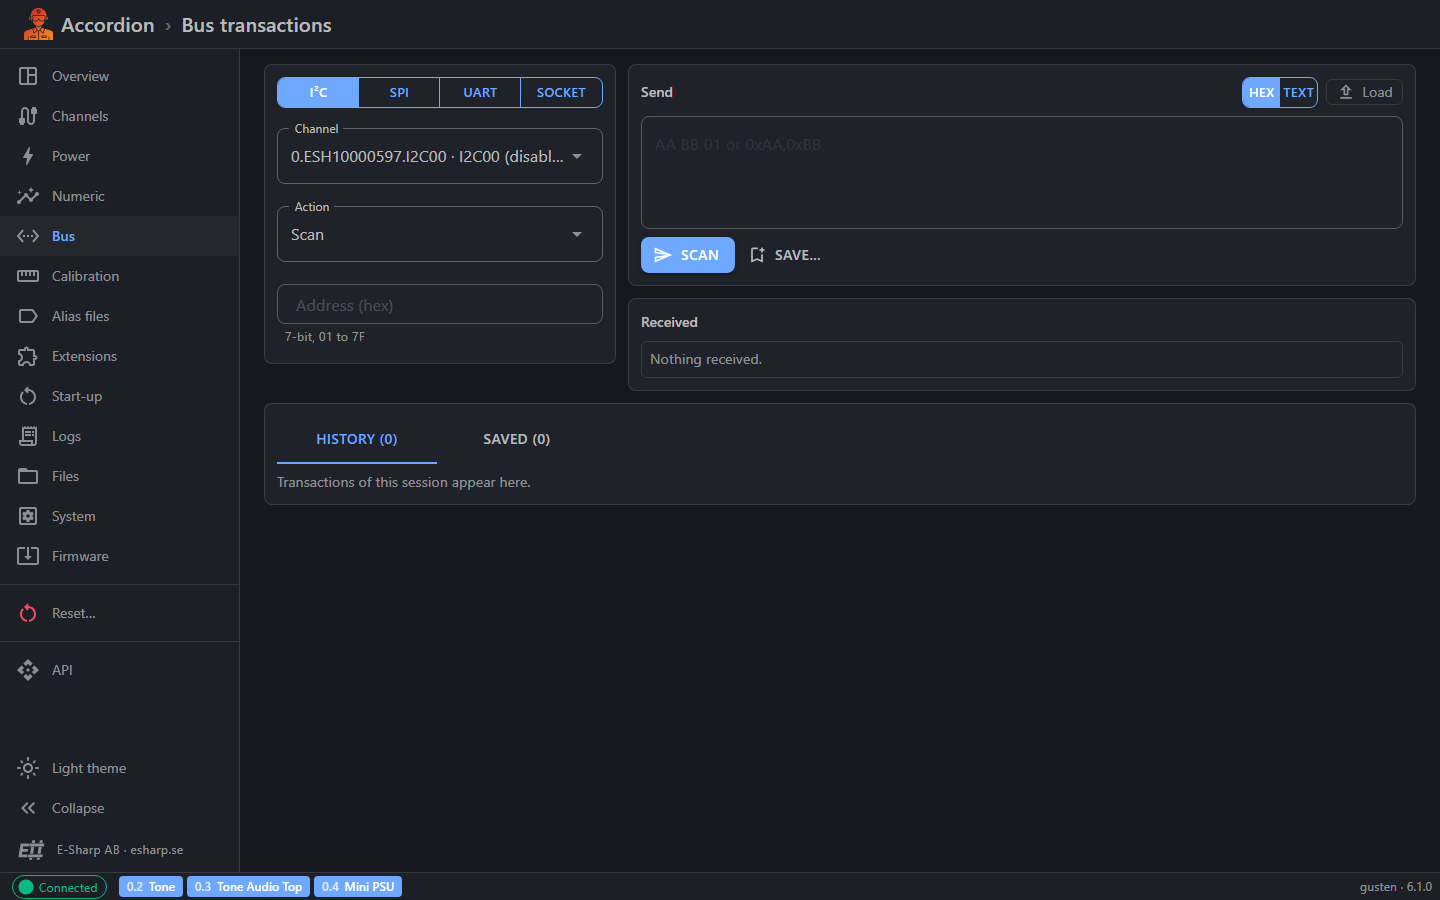
The Bus page lets you send raw transactions on the station's I²C, SPI, UART and socket channels. You can type the bytes to send in hex or as text, view what comes back in a hex dump, read it as numbers, and keep a history of what you ran.
Accessing
-
Open a browser and go to
http://<hostname-or-IP>/of your station. Firmware 6.0 or later is needed. -
Select Bus in the side menu.
The Bus page is always in the menu. A bus type you have no channel for is disabled on the page.
Transactions go straight to the bus. Nothing checks what a device does with the bytes. A wrong write can reconfigure or damage the connected hardware, and a long receive holds the bus for every other client. The first time in a browser session, you are asked to confirm before a transaction runs.
Choose the bus and channel
-
Select the bus type at the top: I²C, SPI, UART or Socket. The page opens on the first type your station has.
-
Select the Channel. Each channel shows its alias or name, and the device name. A channel that is turned off is marked (disabled).
-
Select the Action.
When you select a channel, its own settings (for example clock speed, SPI mode, baud rate, bus type or termination byte) are filled in for you. You can change them for this transaction.
Actions per bus type
-
I²C: Scan, Send, Receive, Send and receive.
-
SPI: Send and receive, Send, Receive.
-
UART: Send and receive, Send, Receive, Break, Clear buffers.
-
Socket: Send and receive, Send, Receive.
Bus settings
I²C
-
Address (hex): the 7-bit device address, 01 to 7F. Not used for Scan.
-
Scan: lists the addresses that answer. A message shows what was found. A Found list then appears next to the address, so you can pick a device.
SPI
-
Mode: Mode0 to Mode3.
-
Clock speed in Hz.
-
Chip enable active high: turn on if the chip-enable line is active high.
UART
-
Baud rate: 9,600 to 921,600.
-
Parity: None, Even, Odd, Mark or Space.
-
Flow control.
-
Bus type: RS232, RS422 or RS485.
Socket
-
Host and Port (1 to 65535) to connect to.
Timeout and termination (UART and Socket)
-
Timeout: how long to wait for a receive, in milliseconds. The maximum is 15,000.
-
Termination byte: a hex byte that ends a receive. The default is
0A(line feed). -
For a socket, the termination byte is also added to what is sent. Termination is on by default for sockets.
-
For UART, turn on Append it to the data to add the termination byte to what is sent.
Bytes to receive
For Receive and Send and receive, set Bytes to receive (1 to 65,536). With a termination byte, this is the maximum. The termination byte may end the receive sooner.
Send data
Type the bytes to send in the Send box. Use the Hex and Text buttons to choose how you type them.
-
Hex: pairs of hex digits, for example
AA BB 01,0xAA,0xBBorAABB01. -
Text: plain characters, for example
*IDN?\n. Use\r,\n,\t,\0,\\and\xNNfor other bytes.
Below the box, the page shows the number of bytes and the same bytes in the other form. If the input is not valid, an error tells you why. When you switch between Hex and Text, what you typed is converted, so the bytes stay the same.
Click Load to fill the box from a file (up to 64 kB). A .txt file with hex bytes is read as hex. Any other file is read as raw bytes.
Click the run button (it shows the action name, for example Send and receive) to run the transaction.
View received data
The Received panel shows the number of bytes and a hex view of what came back.
Hex view
-
Each row shows the offset, up to 16 bytes in hex, and the same bytes as characters.
-
Bytes that are not printable characters show as a dot.
-
Click a byte to select it as the start for the number readouts. Hover over a byte to see its offset.
Number readouts
From the selected byte, the page shows the bytes as:
-
8-bit unsigned and signed integer, and the 8 bits.
-
16-bit, 32-bit and 64-bit unsigned and signed integers.
-
32-bit and 64-bit floating-point numbers.
Choose Little endian or Big endian for the byte order. Readouts that need more bytes than are left are not shown.
Copy and save
-
Hex: copies the received bytes as hex text.
-
Save: saves the received bytes as Binary (.bin), Hex text (.txt) or Table (.csv). The table has offset, hex, decimal and character columns.
If a transaction fails, the panel shows the error. Click Details to see the full message.
History
The History tab lists the transactions of this session, newest first. Each row shows time, bus, channel, action, the bytes sent and received, and the time taken in milliseconds. Failed transactions are marked and show the error.
-
Hover over the sent or received bytes to see them as text.
-
Run again: runs the same transaction again.
-
Load into the form: copies the transaction into the form so you can change it.
-
CSV: saves the history as a CSV file.
-
Clear: empties the history.
The history is not kept when you leave the page or reload the browser.
Saved transactions
Save a transaction you want to run again later.
-
Set up the transaction in the form.
-
Click Save… and enter a name. Using an existing name replaces that saved transaction.
The Saved tab lists your saved transactions. For each one you can Run it, Load into the form, or Delete it.
Saved transactions are kept per station, in your browser. They are not stored on the station, and they are not shared with other computers or browsers.
Tips
-
Start with an I²C Scan to find the devices on a bus, then pick an address from the Found list.
-
Use Text mode for instrument commands, such as SCPI commands over a socket.
-
Save a received dump as Hex text (.txt). You can load it back with Load to send the same bytes.
-
Keep receives short. A long receive holds the bus for every other client.
-
If another client holds the station, the page says so and transactions cannot run until it is free.