

The Channels page lists every channel in the station, with live values. You use it to find a channel, read its value, set an output, see its statistics and trend, view its details, change its configuration and send it to the chart.
Accessing
-
In the side menu, click Channels.
-
Or click a module chip in the status bar. The Channels page opens with the search already filled in, so you see only that module's channels.
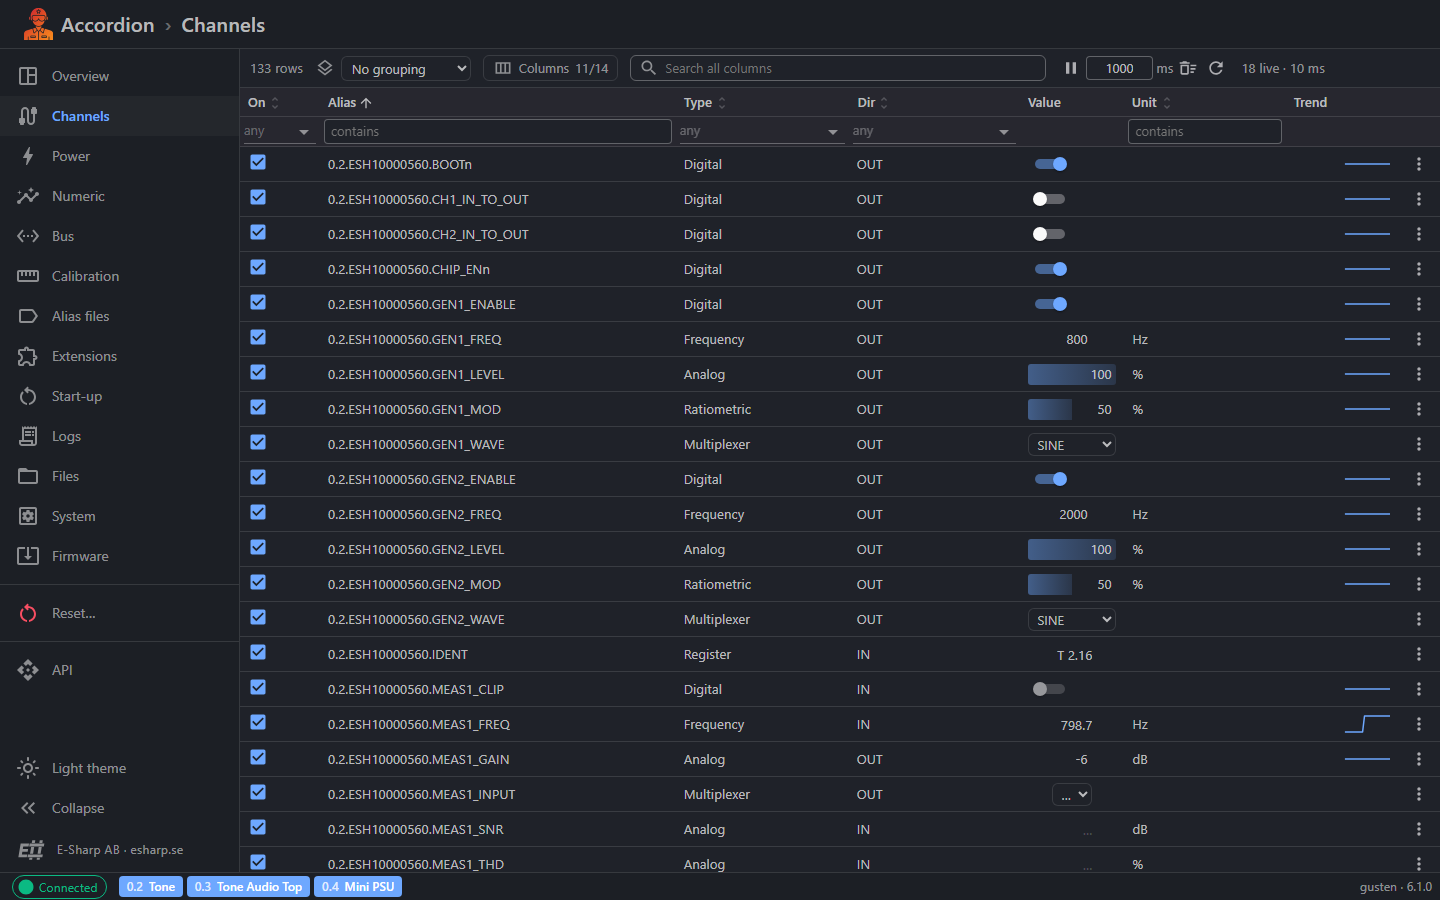
The channel list
Each row is one channel. The list is sorted by alias when you first open it.
Columns
|
Column |
What it shows |
|---|---|
|
On |
A ticked box when the channel is enabled. |
|
Group |
The group the channel belongs to. |
|
Alias |
The channel's alias: the name you usually know it by. |
|
Net name |
The channel's full net name, for example |
|
Type |
The channel type, for example Digital, Analog, Current or Ratiometric. |
|
Dir |
The direction: IN, OUT or both. |
|
Value |
The live value. For outputs you can change it here. |
|
Unit |
The unit of the value. |
|
Min, Max, Mean |
Statistics over the values read since the list started reading the channel. |
|
Trend |
A small line showing the recent values. |
|
Description |
The channel's description. Hidden by default. |
|
Device |
The device the channel belongs to. Hidden by default. |
|
⋮ |
Opens the channel's menu. |
Rows in italics are system channels, such as system controls and bus signals. You can read them, but not set them.
On a narrow screen, the less important columns drop out first so the name, value and unit stay in view. On a phone, each row becomes a card, and one Name field shows the alias, or the net name when there is no alias.
Row count
The bar above the list shows how many rows are shown, for example 12 rows of 240 when a filter or search is active.
Finding channels
Search
-
Type in the Search all columns box above the list.
-
A row is shown when any visible column contains the text, in any case.
-
The search also matches the net name, even when the Net name column is hidden.
Filter a column
Under each column title there is a filter.
-
Text columns: type part of the text. The filter matches anywhere in the cell, in any case.
-
Type, Dir and On: pick one or more of the values in the list. Clear the box to show any.
-
Value, Min, Max, Mean and Trend have no filter.
-
Filters and the search work together. A row must match all of them.
-
Click Clear filters in the bar to remove every column filter at once.
Sort
-
Click a column title to sort by it. Click it again to reverse the order.
-
An arrow shows the column and direction you sort by.
-
Names sort in natural order, so
CH2comes beforeCH10.
Group
-
In the bar, open the grouping list (it starts as No grouping).
-
Pick Group by Group, Group by Type, Group by Dir or Group by Device.
-
Each group gets a header with its name and number of rows. Click the header to collapse or expand the group.
Choose columns
-
Click Columns in the bar, or right-click any column title. The button shows how many columns are visible, for example 11/13.
-
Click a column name to show or hide it. The menu stays open, so you can change several columns in one go.
-
Click Reset layout to go back to the default columns, no grouping and sorting by alias.
Live values
The list reads the values of the channels on screen, over and over. Channels you scroll away from are not read, which keeps the list fast with many channels.
Update controls
The controls are in the bar above the list:
-
Pause / Resume: stops or restarts the value updates.
-
Interval (ms): how often the values are read, from 100 to 60000 milliseconds. The default is 1000 ms (once a second). The chart uses the same interval.
-
Clear history: clears the min, max, mean and trend history, so the statistics start again.
-
Reload: reads the channel list again from the station.
Status
Next to the controls, a short status tells you what the list is doing:
-
24 live · 35 ms: 24 channels on screen are being read, and the last read took 35 ms.
-
24 live · pushed: the station sends the values to the Web UI by itself. Several browsers then share one read.
-
Paused: you paused the updates.
-
Read failed: the last read did not work. Hover over it to see why.
You do not need to reload when channels change. If channels are added, removed or reconfigured, from this browser or from somewhere else, the list updates by itself.
What the Value column shows
-
A number, with a light bar behind it for volts (on a 0 to 5 V scale) and for percentages (0 to 100 %).
-
A switch for digital channels. A greyed-out switch is read-only.
-
N/A for a channel that has no single value, such as a bus, a stream, a waveform or an instrument, and for a disabled channel.
-
… while the first value is on its way.
-
Hover over a value to see it exactly as the station reported it.
Setting values
You can set a channel's value when its direction includes OUT and it is not a system channel. How you edit depends on the channel type.
Switches (digital channels)
-
Click the switch in the Value column to turn the output on or off.
-
Or focus the row and press Space.
-
Or open the row menu and click Toggle.
Numbers
-
Click the value, or focus the row and press Enter. An edit box opens.
-
Type the new value. You can use a comma or a point as the decimal separator.
-
Press Enter, or click somewhere else, to send it. Press Esc to cancel.
If what you type is not a number, a warning appears and the edit box stays open so you can correct it.
Ratiometric channels (percent)
Ratiometric values are shown and typed in percent. Type 25 for 25 %. The station receives it as the fraction 0.25.
Multiplexers
A multiplexer shows a drop-down list of its destination nets. Pick one to select it. If the station does not report the destinations, you type the net name instead.
Registers and other text values
Click the value and type the new value as text. It is sent exactly as you type it. An empty value shows as empty, so you still have something to click.
Several channels at once
You can select rows as in a file list:
-
Click a row to select it.
-
Ctrl-click (Cmd-click on a Mac) to add a row to the selection or remove it.
-
Shift-click to select every row between.
-
On a phone or tablet, use Select in the row menu.
-
Press Esc, or click n selected in the bar, to clear the selection.
When several rows are selected, setting a value on one of them sets the same value on every selected row that takes it. Toggling a switch sets the other selected switches to the same new state. If some selected channels cannot take the value, a message lists them and they are left unchanged.
Only the selected rows that the filters show are changed. A row hidden by a filter is never changed without you seeing it.
Keyboard
|
Key |
What it does |
|---|---|
|
Up / Down arrow |
Move to the previous or next row. |
|
Space |
Toggle the switch on the focused row. |
|
Enter |
Open the value editor on the focused row. In the editor, send the value. |
|
Esc |
In the editor, cancel. On a row, clear the selection. |
The row menu
Open a channel's menu in any of these ways:
-
Click the ⋮ button at the end of the row.
-
Right-click the row.
-
On a phone or tablet, press and hold the row.
The menu shows only the items that apply to the channel:
|
Item |
What it does |
|---|---|
|
Read value |
Reads the value once and shows it in a message, for example <net name> = 3.301 V. |
|
Toggle |
Flips a digital output. Only for switches you can set. |
|
Show in chart / Remove from chart |
Adds the channel to the chart, or takes it off. Only for numeric and digital channels. |
|
Acquire waveform… |
Opens the Numeric page with this channel as the target. Only for channels that can be sampled as a waveform. |
|
Details |
Shows everything the station reports about the channel. |
|
Configure… |
Changes the channel's settings. Only for channel types that have settings. |
|
Select / Deselect |
Adds the row to the selection, or removes it. |
|
Clear selection (n) |
Clears the selection. Shown when more than one row is selected. |
|
Copy net name |
Copies the net name to the clipboard. |
|
Copy alias |
Copies the alias to the clipboard. Greyed out when the channel has no alias. |
Details
The Details window lists the channel's net name, alias, description, group, device, index, type (and the types it can be), direction (what it can be and its default), usage, unit, whether it is enabled and whether it is virtual. Below that are the settings of the channel's own type, for example gain and offset, or a multiplexer's destination nets. Click Close or press Esc to close it.
Configure
-
Open the row menu and click Configure….
-
Change the fields you want. Only the fields you change are sent.
-
Click Apply. A confirmation lists each change as old value → new value.
-
Click Apply again to confirm, or Cancel.
The change applies to the hardware at once and affects anything using this channel.
The fields depend on the channel type. Only the fields the station reports for the channel are shown.
|
Channel type |
Settings |
|---|---|
|
Analog |
Gain, Offset, Input configuration, Default value, Resolution (0 to 15) |
|
Current |
Gain, Offset, Default value, Resolution, Overvoltage protection and limit, Overcurrent protection and limit |
|
Ratiometric |
Gain, Offset |
|
Temperature |
Sensor type, Cold junction, Gain, Offset |
|
Resistance |
Clamp voltage, Resolution |
|
Frequency |
Resolution |
|
Digital |
Push type (open drain or push-pull), Pull type (none, down or up), Default value |
|
Pseudo digital |
Low threshold (VL), High threshold (VH), Default value |
|
Virtual digital |
Expression (CUSTOM, AND, OR or TOGGLE) |
|
Actuator |
Toggle, Toggle time (ms), Default value |
|
Multiplexer |
Source net |
|
Register |
Default value |
|
UART |
Baud rate, Bus type (RS232, RS422 or RS485), Termination byte (-1 for none, else 0 to 255) |
|
SPI |
Clock speed (Hz), Mode (Mode0 to Mode3), Chip enable high |
|
I²C |
Clock speed (Hz) |
After you apply, the list reads the channel back, so the row and its details show the new settings.
Statistics and trend
-
Min, Max and Mean are worked out from the values the list has read.
-
A new minimum flashes red and a new maximum flashes blue for a moment.
-
Trend draws the last 50 values as a small line, scaled to fit. A steady value draws a flat line through the middle.
-
Digital channels, multiplexers and registers have no statistics.
-
Click Clear history in the bar to start the statistics and trends again.
What is remembered
These settings are saved in your browser and come back the next time you open the page:
-
Which columns are shown.
-
The grouping.
-
The sort column and direction.
-
The update interval.
Filters and the search are not saved, so a page you open later never hides rows without telling you why. Another browser or computer starts with the defaults.
Example: set a value and read it back
In this example you set an analog output to 2.5 V and check it.
-
Open the Channels page.
-
Type part of the channel's alias or net name in Search all columns, for example
DAC. -
Find the row. Check that Dir includes OUT and that the row is not in italics.
-
Click the value in the Value column. An edit box opens.
-
Type
2.5(or2,5) and press Enter. -
The new value is shown at once. On the next update the list reads it back from the station.
-
To read it once more on demand, open the row menu and click Read value. A message shows the net name, the value and the unit.
-
To follow it over time, open the row menu and click Show in chart.
If the write fails, a red message tells you why and the edit box stays open, so you can try again or press Esc.
Tips
-
Click a module chip in the status bar to jump straight to that module's channels.
-
Show the Net name column when you need the exact name for a script. Or use Copy net name in the row menu.
-
Group by Type to find all outputs of one kind quickly.
-
A long interval puts less load on the station. A short one gives smoother trends.
-
Pause the updates while you compare values on screen.
-
If a banner says the station is read-only, another client holds control. You can still watch values, but changes are refused until it lets go.